

股票代码
837868

设备图标路由器 连接线图标
连接线图标 交换机图标
交换机图标 pc图标是
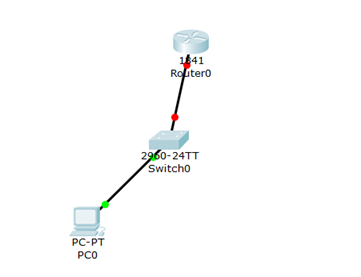
pc图标是 首先打开思科模拟器在思科模拟器上面左下角找到设备图标把他拖拽到空白处,用连接线把设备与设备之间连接起来如下图
下面所有设备单击打开找到CLI点击输入no回车以后就可以进设备去配置了,输入en回车show run查看一下设备有没有配置ex退出输入config两次回车进入全局配置就可以做单臂路由配置了,在思科 2960交换机SW0配置信息:
#特权模式下进入vlan子模式
Switch#vlan database
#创建vlan 10并命名vlan10
Switch(vlan)#vlan 10 name vlan10
#全局模式下进入fa0/1-5端口
Switch(config)#interface range fastEthernet 0/1-5
#设置工作模式为access,只允许一个vlan通过
Switch(config-if-range)#switchport mode access
#允许vlan 10 通过
Switch(config-if-range)#switchport access vlan 10
#激活端口
Switch(config-if-range)#no shutdown
全局模式下进入fa0/24端口
Switch(config)#interface fastEthernet 0/24
#设置工作模式为trunk,允许多个VLAN通过
Switch(config-if)#switchport mode trunk
#激活端口
Switch(config-if)#no shutdown
Switch#wr (保存配置命令)
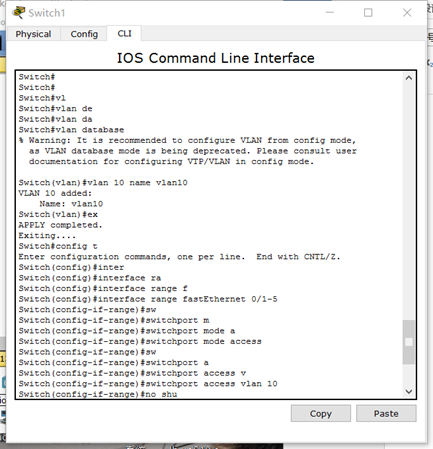

交换机Switch0配置完成
路由Router0配置
Router(config)#interface fastEthernet 0/0.1
#将虚拟子接口fa0/0.1划分到vlan 10并封装格式为802.1q
Router(config-subif)#encapsulation dot1Q 10
#设置IP地址及子网掩码
Router(config-subif)#ip address 192.168.10.1 255.255.255.0
#激活虚拟子接口fa0/0.1
Router(config-subif)#no shutdown
#全局模式下创建dhcp地址命名为vlan10
Router(config)#ip dhcp pool vlan10
#设置vlan 10获取的IP地址及子网掩码
Router(dhcp-config)#network 192.168.10.0 255.255.255.0
#设置vlan 10的dhcp默认路由
Router(dhcp-config)#default-router 192.168.10.1
#全局模式下进入fa0/0端口
Router(config)#interface fastEthernet 0/0
#激活端口
Router(config-if)#no shutdown
#全局模式下进入fa0/0端口
Router(config)#interface fastEthernet 0/0
#激活端口
Router(config-if)#no shutdown

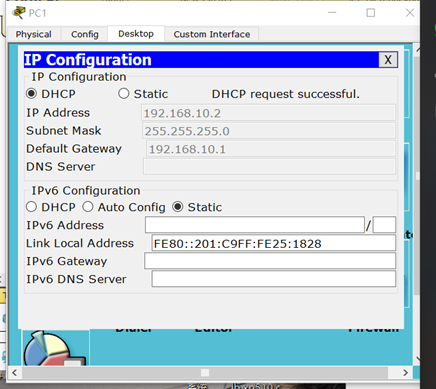
路由router0也配置完成可以在pc里面查看一下地址有没有下发如图:
以上是我分享的单臂路由和dhcp分发地址的小知识。


专注数字化方案建设,推动智慧企业生态圈的升级发展